About This Blog

Xenophon's Ghost covers military history and wargaming from the ancient period to modern times.
Showing posts with label Kappadokians. Show all posts

Friday, June 7, 2013

Jeff's Farewell Game Day

Jeff and Ryan at Battle
Jeff Franz has been the orchestrator of our DBA games in Seoul, and he gathered the largest group yet for one more game day.  We had six experienced players, and Tony's daughter Erin also gave DBA a try with a few games, using my Galatians.

The seven armies:

  • Warring Chin Chinese (II/4A) (See the Army on Jeff's Blog) --Jeff
  • Late Ottomans (IV/55b) --Ian
  • Kommenan Byzantines (IV/1)--Tony
  • Late Imperial Romans (II/78)--Ryan
  • Late Persians (II/7)--me
  • Kappadokians (II/14)--Rob
  • Galatians (II/30b)--Erin
A few snapshots follow.

I didn't manage to track all of the results, but Jeff once again dominated his games.  He also helped teach Erin, playing his Chin Chinese against the Galatians.
Chin Army engages Galatians

Ian and Tony's game resulted in a major engagement on the Kappadokian's flank. The Kappadokian camp is the yellow square.
Kappadokians battle Ottomans
Ryan lost three games against Jeff, Tony, and Ian, but he beat me. Roman Blades chopped up the Persians rather quickly. 
Persians and Romans advance

Ryan eventually lost to Ian's Ottomans; however, his Light Horse managed to impel a flank attack during the bout.
Ottoman Horse Recoil from Roman Light Cavalry

My Persians lost against the Romans and Byzantines, but I managed to beat Rob in a difficult match, thanks to great dice rolls. Rob places a river down the center of the board, rated as ordinary.  It really complicated maneuver. 

Kappadokians Cross the River

Ian aggressively engaged Tony's Byzantines, but I didn't catch the final result.
Byzantines Vs. Ottomans


Jeff, we will all miss your extensive DBA knowledge, organizational skills, inspirational painting, and sportmanship.  Best of luck in San Antonio!

Saturday, May 4, 2013

DBA Game Day

Our DBA group played a few games last weekend.  The following armies battled:

  • Seleucid (Jeff)
  • New Kingdom Egyptians (Rob)
  • Ptolemaic (II/20d) (me)
  • Kappadokian and Arab Conquest (Ryan)
Ryan and I played first. He used the Kappadokians for his first two matches, playing Arab Conquest once against Jeff's newly painted Seleucids.  Ryan had a pretty good winning streak, but he lost all his games today.  He ended up playing the attacker all three times when defense would have suited his force more.  
Ptolemaic vs. Kappadokian
I didn't take too many photos this time, but I did manage a shot of the final fight of our first match.  The Kappadokians had no rough to use to their advantage, and the battle turned into a slugging match.

Elephants force Kappadokian General to Recoil with no room

 My Ptolemaic force is littoral, but I ended up with the water to my back on two occasions.  My bout with the New Kingdom Egyptians featured two amphibious landings, with two Egyptian elements going after my camp.  I finally killed them both, beating the Egyptians 5 to 1.

The fight against Seleucids was very intense, with fights on both flanks and a Scythed Chariot that refused to die for many turns.  Jeff showed his tactical skill again, winning 5 to 1. You can see more photos of the army on his blog: http://littlehordes.blogspot.kr

Final Fight - Seleucids vs Ptolemaic
Of the numerous Successor states, I must say that I like the way the Ptolemaic list plays.  The combination of four Pikes and two Blades, plus an Elephant and some mounted, works pretty well.

Final Tally:


Army
Wins
Losses
New Kingdom Egyptians
1
2
Ptolemaic
2
1
Kappadokian
0
2
Seleucids
3
0
Arab Conquest
0
1


Saturday, March 23, 2013

DBA Game Day


Jeff assembled a group of five for DBA this weekend; Ryan, Rob, Ian, and me joined Jeff who graciously arranged the location and provided terrain and game mats.  We rotated turns, with the winner continuing to play.  Jeff sat out the first round.  This was Rob's first time playing DBA in five years, but he fared well.

 The Armies 

  • Kappadokians (Ryan)
  • Phokians (Jeff)
  • Serbian Empire (Rob)
  • Palmyrans (Jeff)
  • Seleucids (a) list (Dave)
  • Alexandrian Imperial (Dave)
  • Patrician Romans (Ian)


Game Results

The number represents the elements killed by the army.  Green shading marks the victor.


Game Results
Patrician Romans
Serbian Empire
Alexandrian Imperial
Palmyrans
Seleucids
Kappadokians
Phokians
Comments
Game 1


0
3

Seleucid Gen killed
Game 2
1
4


Serbs captured camp
Game 3


2
4
Kap Gen killed
Game 4

4
3


Nail-biter
Game 5
2


5


Palmyran Gen killed
Game 6 

5


2

Close until the end
Game 7


2
4


Pikes need patience


Eye Candy

My photo coverage was uneven, but here are a few highlights.

Kappadokians vs. Seleucids

Initial deployment
Psiloi ZOCs Elephant, forcing retreat
Scythed Chariot surrounded
Serbians vs. Patrician Romans

Serbian Knights advance while Bow move into woods
Mayhem
Phokians vs. Kappadokians
Kappadokian horse fighting alone
Hand of God assists Phokians in trapping Kappadokian General
Palmyrans vs. Patrician Romans

Palmyran General fights Blades 
Kappadokians vs. Serbians

Kappadokians await Serb Attack: LH withdraws after successful raid

Palmyrans vs. Alexandrian Imperial Army

Companion Cavalry surrounded by Palmyran Bow


Final Results


In the end, all of us had a fun day of gaming in these friendly matches.  Jeff displayed his usual strong skills, and Rob played very well despite his long furlough.  Ryan is continuing to improve, and he handled this light army quite well.  Ian and I tried hard...I must be more patient with the Macedonians (or maybe it is time to play some other army that fits my desire to attack quickly better).


Player
Armies
Wins
Losses
Jeff
Phokians (1), Palmyrans (2)
3
0
Ryan
Kappadokians
1
2
Ian
Patrician Romans
0
3
Rob
Serbian Empire
3
0
Dave
Seleucids (1), Alex Imperial (2)
0
3


Sunday, December 16, 2012

The Final Fights

The day ended with a new army in the mix.  The group encouraged Ryan to try his hand at a new army  to see how the play differed from Spartans.  His choices included New Kingdom Egyptians, Ottomans, Phokians, and Alexandrian Macedonians.  He went with Jeff's Phokians, which included two artillery elements, and fought my Seleucids.  Meanwhile, Jeff and Ian duked it out.

Phokians and Seleucids

The terrain situation in this game was UGLY for the Seleucids.  I initially tried to run my cavalry around the hill on the left, apparently not learning from a previous mistake.  Ryan got an Auxilia on the hill, so I wasted time and PIPs circling back.  Aside from that trick, I decided to attack right into the kill zone: the artillery elements are centered on the road.  I launched the Scythed Chariot at the Spear General and almost won the dice roll...almost.

Seleucids advance up the Pass

Deciding to stick to my plan of killing the General, I managed to do so with a Cavalry, after a tight maneuver around a Psiloi's ZOC.  My Cav was subsequently killed.  The stone throwers picked off a Pike as I advanced.

Pikes under fire

Ryan really limited my options with his creative deployments. The combined effect of the Spear ZOCs and the Ax/Ps ZOCs from bad going gave me few good options.  My attempt to move the Pikes out of the fire zone resulted in a Psiloi, with a toe in bad going, killing another Pike.  Another artillery shot took out element number four - another Pike.


Few Good Choices (but a nice shot of Jeff's Phokian shield designs)
The final loss count:  Phokians - 1 Seleucids - 5 (including 1 SCh).  I have included a shot of the final battlefield situation.  My Elephant is doing a wonderful job grazing and guarding the camp.

End Game
Arabs Conquer All 

I was so busy trying to solve the terrain nightmare facing me that I forgot to take photo's of Ian and Jeff's game.  I managed one shot.  This is unfortunate; it was a good, close game with a few twists.   Jeff managed to lose his General early and still hang on for the win, killing Ian's General in the process.

Arabs fight the Kapps

Ian posted his account on a ROK Wargaming Group, so I will quote his version of history:

"My light horse attempted an assassination again getting around the flank of his cav, however when this failed I lost them both. I countered slamming my general into the flank of his and killing him....and tried to jump his cav and light horse with my cav general
and supporting cav. This was probably a mistake and I would have been better
off pulling out as he was going to be double pipped on command. My over
aggressiveness cost me and my army folded."

Final Losses:  Arabs -1 (Gen) Kappadokians - 4 (including Gen)


Assessment

We all had fun, and I learned a lot about DBA tactics.  Ryan left motivated to get his own army.  He was first thinking about a blade heavy force, but he is now looking at army lists that feature a lot of cavalry with either blade or spear for foot support.  Thanks again to Jeff for organizing this session.  We plan to meet again in January.  I hope that the battle reports  are an enjoyable read.


Friday, December 14, 2012

Sparta & Kappadokia

Carrying on with the play-by-play for our Seoul-Micro-Con, lets look at Ian's Kappadokian fight against Ryan's Spartans.  Ryan deployed his Spears in a long line on the right, supported by a smaller group on the left with the Cavalry element.

Spartans Advance
  Ian formed a cavalry element on his right, placing most Auxilia on his right, facing the main Spartan line.  Early in the game, he advanced his main foot body into bad going.  He pushed one Psiloi out front.


Auxilia seize the rough going
Spartan hoplites killed the lone Psiloi, as Ian shifted the cavalry to the center.  This move took the slower flank hoplite formation out of play.  In the middle of the game, Ian's command luck failed him; he rolled many 1 PIPs.  However, he opened up the field in a cavalry stand-off that the Spartans lost.


As the fight developed, the Spartans were confronted on two sides, with little maneuver room.  Ryan stood his ground despite a series of flanking moves that took out two Spears.  In response, he managed to kill one Light Horse and an Auxilia.


Heat of Battle

 Eventually the Kappadokian's mobility paid off, as a cavalry flanking move killed a final Spear element.
End Game
The final loss count was Kappadokians - 3 and Spartans -4, another win for Ian.  He complemented Ryan's grasp of the rules.

Tuesday, December 11, 2012

Game 3 - Kappadokians and Seleucids

While Jeff and Ryan fought two games, Ian and I finished one.  Ian led Kappadokians against my Seleucids, the attackers.  Ian set up the terrain heavy on one side, so I tried to deny him the use of it in my side choice.  However, I still managed to play to his game plan, and Kappadokian strengths, demonstrating my lack of experience.  I didn't deploy to my advantage.

Deployment
I fragmented my force, trying to swing a Kn and Cav around the left flank and moving my heavier forces along the right.  Insanely, I considered moving my Pike directly forward onto a bad going hill.  If Jeff had not pointed out that Pike would not far well against Auxila, the game might have ended sooner.  I ended up deploying the Pike in a line along the hill, which essentially kept them out of the battle.


Ian's luck with the dice was low at the beginning of the game; he rolled a lot of 1 and 3 PIPs.  However, I spent a lot of PIPs trying to get my act together.  Having a group comprised of an Elephant, Scythed Chariot, and Warband didn't work out too well for me, so I ended up with single elements scattered everywhere.  Ian quickly seized two key terrain features with his light troops.

Scattered Seleucids


First blood was drawn when I tried to run my Cav element along the board edge.  A Psiloi engaged from the rough, and I learned two lessons: the rule on mounted engaging light foot in the rough and the danger of recoiling off the board.

Ouch!
In the photo below, you will note the the Scythed Chariot is now missing.  It was fun to try out this element type, but it never paid off for me.  Ian is certainly managing his forces better, and I'm realizing that the powerful elements of the Seleucid army are not so powerful against a light foe like the Kappadokians, at least not under my direction.  I did manage to kill off one Light Horse with a Knight.

Few Good Choicses
 My elephant was flanked and killed.


Soon after, I lost a Warband.  I tried to maneuver my Pike into the center, but another mounted element loss ended the game.


Final Losses:  Kappadokians 1 - Seleucids 4 (+ Sch)


Monday, December 10, 2012

Seoul Mini-Tourney

Jeff organized a mini DBA 2.2 tourney in Seoul yesterday.  The players and armies were:
  • Jeff  - Arab Conquest
  • Ian - Kappadokians
  • Ryan - Late Spartans, Phokians
  • me - Seleucids (c list)
In about three hours, we played eight games total.  I will share photos of the games in the next few posts.  I tried to take photos and play at the same time, so the coverage will be inconsistent.  I also took more shots at the beginning of the session than the end.

It was a great time.  Having had little playing experience with others, Ryan and I both left motivated.  My son is thinking about procuring his own army....leaning towards a Blade-heavy list.  Jeff and Ian are both good sports.  Ian has a lot of DBM experience, so it was interesting to learn about the differences in the rules.

The Winner Is....

Jeff and his Arab Conquest army were unbeatable.  Ian gave him a good run with the Kappadokians in the final game, and the second Arab-Seulicid match could have gone either way, but Jeff was undefeated.

I need a lot of practice with the Hellenistic armies and in using terrain more effectively.  I failed to create a plan that would maximize the strengths of the Seleucid list.  The Arabs and Kappadokians were particularly difficult for me.  The strengths of the Seleucids, namely the Pikes and Elephant, were not very effective against these lighter and faster foes.  Twice I made the error, once fatally, of trying to send a cavalry unit through a narrow gap between a hill and board edge.  Despite those challenges, I had fun playing a new army and enjoying the fruits of my painting effort.  Although it scored no kills for me, the Scythed Chariot was fun to try out.

Game 1 - Arab Conquest vs. Late Spartans

My son Ryan and I are still newbies.  We both understand the rules in general, but there is a a lot of nuance in DBA.  As Jeff noted, Ryan played a tough army for a beginner - Late Spartans.  It consists of nine spear, one cavalry, and one psiloi.  The Arabs were a combined arms group of mounted, warband, and bow.  Warband QK Spear, so Ryan was in for a tough fight.  

Arab Conquest vs. Spartans
As the defender, he laid down a river across the center of the board.  The river ended up as a paltry crossing, and the battle turned into a slugfest along the banks.  If it had been impassable, the game might have been much slower...


The Arab Light Horse made it across and helped in a flanking move.  The game ended quickly with a 0 Arab - 4  Spartan loss result.


Game 2 - Arab Conquest vs Spartan Redux


Absorbed in my own troubles, I didn't snap a photo of Game 2 until the Arabs had seized the high ground and sent Light Horse on to a flank.  Jeff is not a timid player...The Spartan Cavalry is out there by itself on the far right.  Ryan had attempted to run around the bad going to chase the bow, but Jeff moved the bow into the rough.


Ryan ended up fighting in multiple directions with the Light Horse pestering him in the rear.  After losing two Spear, he managed to flank and kill one Warband.


The Light Horse was headed to the camp after disrupting his line.  In the end, the Arab Warbands Quick Killed a total of four Spear.  Result: 1 Arab to 4 Spartan losses

In the next post, I'll share the results of a much slower game: Kappadokians vs. Seleucids.  I lacked a good plan of action, scattering my force.  The dice gods didn't favor Ian for the first half of the game.

Wednesday, August 29, 2012

Latest DBA test run

We finally moved into our condo and received a small shipment of our belongings.  Typhoon Bolaven hit Seoul, so I came home from work early and managed to play a game of DBA.  A new version of DBA 3.0 was posted in early August, so I tested it out solo. Lacking my game board, I marked off a 32 inch square on our dining table.  This is the first time I have played on a larger field, and the extra space was noticeable.

The Kappadokians fought with Knights as the mounted choice because of their strength against warbands.  The Army list provides a choice between Cavalry or Knights.  I also deployed one spear element.  The latest version of DBA includes two foot classes: fast and solid.  I played the Kappadokian auxilia as fast.

On the other side of the field were Galatians with a Lt Chariot General.  I played the war bands as solid foot.  It will be interesting to see how the final Army lists represent Galatian warbands.

The Kappadokians defended.  My basic strategy for the Kaps was to hold a line along the bad going terrain as long as possible and use the Knights to take out warband elements.


For the Galatians, I planned to attack the Knights with Cavalry and push the Warbands into rough going, aiming to destroy the auxilia units.


The Kappadokian Knights tried to maneuver to the right flank to engage the warband elements, while Galatian cavalry tried to check them.

For several turns, the Galatians rolled low PIPs, so the Knights were eventually able to engage thanks to a flanking move by the Kappadokian Light Horse.

I won't begin a rant on the terse wording of the DBA rules, but I am not entirely sure that I moved the LH elements correctly on this flanking move.  I have included a play-by-play of the move to contact the Galatian LCh General.


I moved the LH forward, and then flanked the Gen with the right element.  On further review, I think the Gen should have turned to face the first LH that made contact, and the second LH move to flank appears legal.   Welcome feedback.

The combat resulted in the LH recoiling.  Eventually, the General destroyed one LH element.  However, Kappadokian Auxilia flanked a Galatian cavalry element and destroyed it.  The remaining Galatian Cavalry and Auxila fought several more rounds of combat that resulted in tied rolls, so there were no effects on either force.  I was surprised at the resilience of auxilia in the current rules version.

The Galatian warbands on the Kappadokians left flank engaged Psiloi in the woods, but two rounds of combat only resulted in the Psiloi recoiling. 


 This final photo depicts the situation right before the Kappadokians Knights, who had finally moved to contact with the Warbands, finished them off, killing three Warband elements in a row.

It was good to play again, although playing a new rules version solo isn't the most exciting or fastest method.  It did give me a chance to learn the new differences, and I don't really have much criticism.  Of course, several of the new features in DBA 3.0 didn't come into play given the element types in the two armies.  The movement rates allowed for fast movement to contact, but the combat factors (and the dice rolls) resulted in six solid rounds of combat.  It wasn't over quickly until the Knights hit the Warbands and got lucky with the dice.

I was introduced to another DBA gamer here in Seoul via the Yahoo list, so we plan to meet in September.


Tuesday, January 10, 2012

Battle of Broken Stick - DBA 3.0 Play Test

Ryan and I completed our third test of the DBA 3.0 rules.  The Kappadokians faced the Galatians.
Kappadokian Light Horse


Unlike the first two tests, these armies represent historical foes.  I played the Kappadokians (II/14), and Ryan commanded the Galatians (II/30b).  In terms of army element options, we both chose Cavalry Generals.
Kappadokian General Element

In this game, the Kappadokians played as defender in hilly terrain.  This was the first playtest game that involved terrain without a road.  I chose relatively small pieces of terrain, including hills, woods, and a patch of rough (rocky ground).

Terrain and Deployment Rules
Ryan and I agree after three games that the new terrain placement rules work fine.  However, the only drawback is the constraints placed on terrain distance from the end of the board edge, when combined with the limited deployment area for the armies. 

In all three games, I have found myself stymied by the deployment area rules.  Terrain must be placed at last one base width from the board edge.  If rough going terrain ends up in your deployment area, it can force choices that do not appear to represent historical situations - either bunch your forces in a narrow area or deploy forces that extend into bad going.

As a newby, I have struggled with the logic on the terrain placement rules regarding the board edges.  My review of ancient battles shows examples of generals using hills and other rough terrain to protect a flank.  Rough terrain often define the battle side edges, so I don't appreciate why DBA requires positioning of terrain away from the edge.  I can only surmise that this rule is meant to address practices observed in competitions.  I struggle to find a good reason for the restriction, particularly considering the constrained deployment area.

On to the battle!

Given the terrain constraints, I decided to try a Light Horse run toward the Galatian Camp, understanding the risks related to being cut off.  Taking the risk paid off.  Not only did the Light Horse advance quickly to the camp, the move pulled Galatian Warband units off the main group in a futile attempt to counter these light forces.

Two turns in, the Galatian general plans his next move - dealing with a LH run at his camp.

Light Horse elements move fast, but they lack punch.  Once the two LH elements reached the camp, one element protected the rear of the attack.  The Galatian camp followers were resilient; the camp didn't fall for four turns.

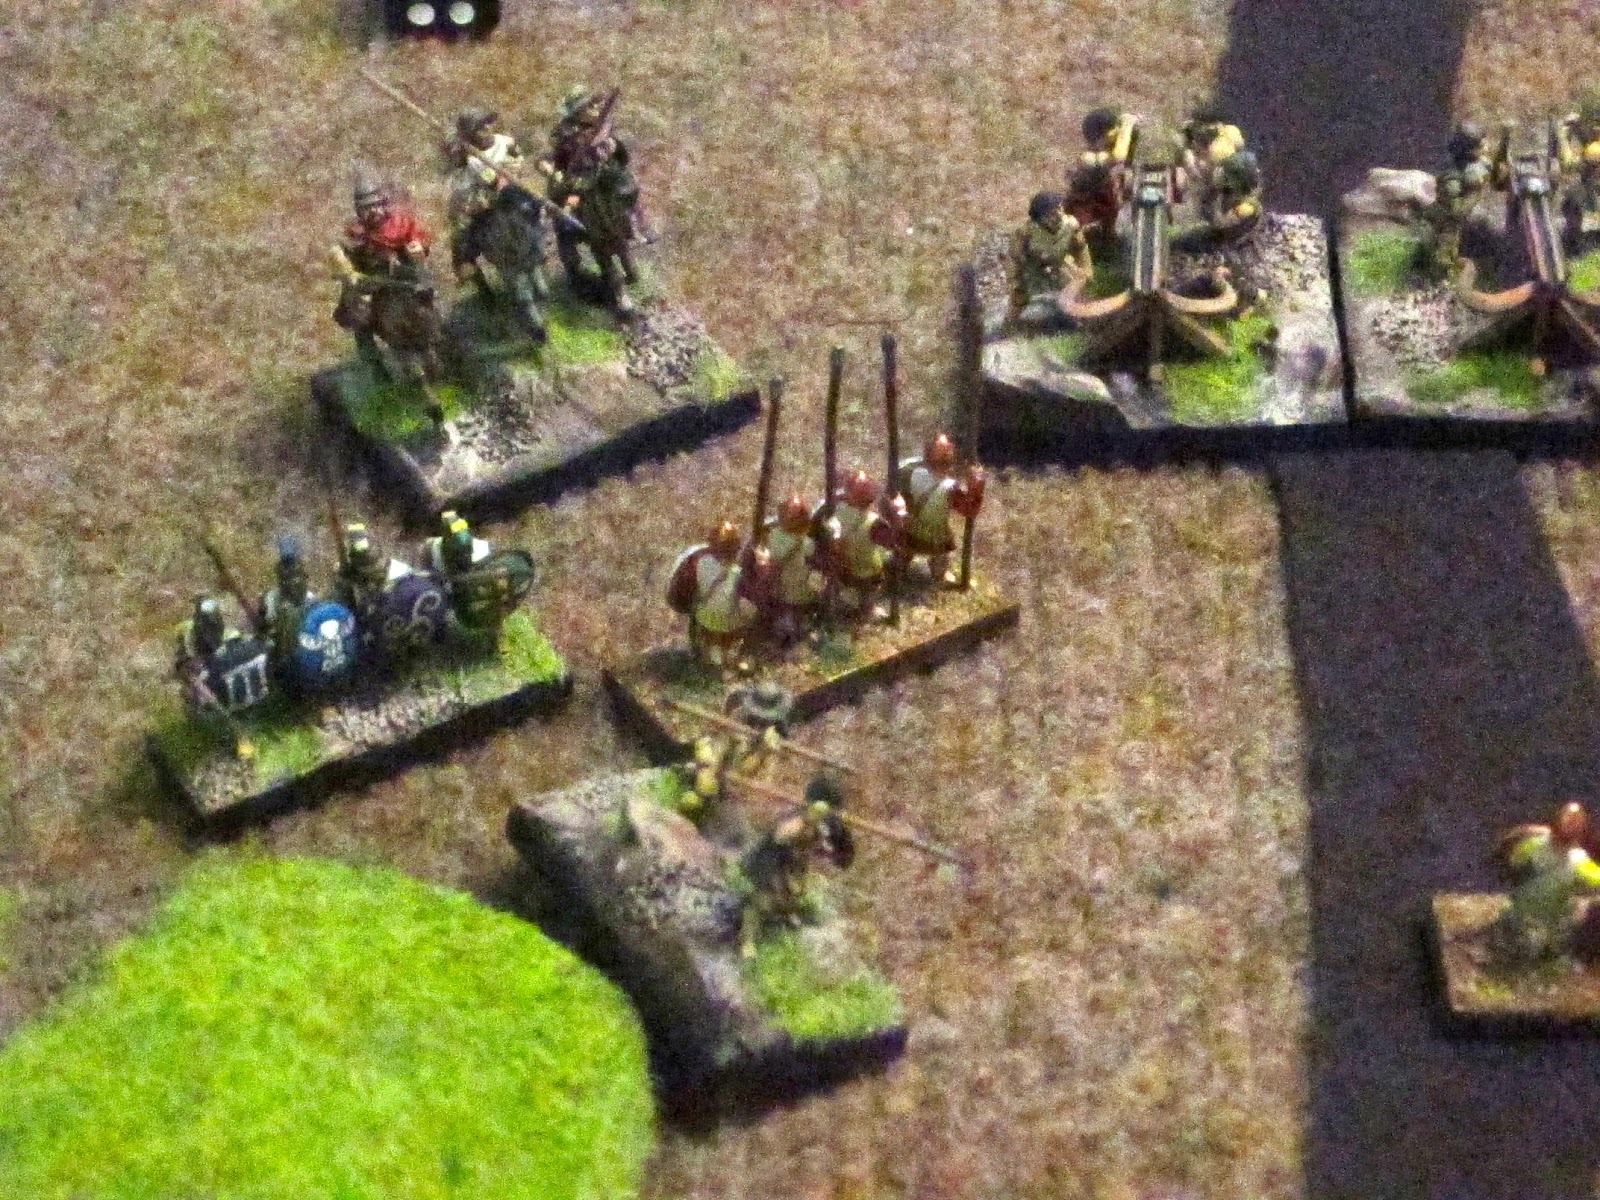
While A few Galatian Warbands tried to address theKappadokian Light Horse charge on their camp, the main battle developed with a cavalry duel - Three on Three.


Galatian Psiloi later moved out of the rough to provide support in the form of an overlap. The Galatians gained the upper hand, flanking and destroying a Kappadokian cavalry unit. 


Kappadokian Auxilia support Cavalry
Kappadokian auxilia moved forward to fill the gap on the cavalry's left flank.

On the Galatian left flank, the dice gods favored the Light Horse, resulting in a lost warband unit.


The main Kappadokian auxilia force engaged the Galatian Warband main body, defeating one

In a nice change from the norm, I actually won a game; 4 to 1.  The Galatians lost their camp and three elements.


Hot Wash

Overall, we have made the transition to 3.0 with few problems.  My main concern is the limited deployment area, in terms of the limitations to use the sides of the board for deployment.  I am tempted to use a larger board instead of the 24 inch board if this rule stays the same.

Following the discussion on the Yahoo Group, we have not tested aspects of the 3.0 rules that appear most controversial - namely the introduction of double elements and Blades-vs-Warband face-offs.

As a new player, I still wrestle with the terse, complex sentences in the rules.  DBA rates at the top of the scale in terms of potential to encourage the next generation of wargamers to get involved in historical games.  However, the rules rank at the very bottom in terms of clarity and utility.  I would have never considered DBA if I hadn't stumbled upon the Unofficial Guide on the Fanaticus webpage.  The structure and editing of the rules is a major barrier of entry.  When my son demonstrates DBA to his 11-to-12 year old friends, they unequivocally are fascinated by the game and love playing.  I hope that the Barker family works with the DBA community, and a good editor, to address shortcomings of the writing of these rules.

One of my goals for this blog is to review wargames rules with my kids, and their friends, to understand why game design features are valued by young gamers.  DBA features that appeal to younger people include the rapid play, balance between unit types, and the impressive list of Army options.  The low figure count needed to assemble an Army is a huge plus.  However, the rule's dense writing style is a major entry barrier.  Using tables and examples would make the rules more accessible.

After my business trip, I'll return to painting my Hellenistic Morph Army, so we will try out 3.0 with a Pike-heavy force later this month.

The Battle's Name

With the change in pace measurement from inches to base width, I made a measuring stick that marked off 40mm paces and 1/2 BW measurements before our Game 2 test.  The stick was a casualty of the game, proving too weak to be sat on.  A little blue masking tape held it together!

Writing from Waikiki...